
Water meter and Home assistant

Guide: Reading Multical 21 & FlowIQ 2200 Water Meters in Home Assistant via ESPHome
Introduction
This guide explains how to read Wireless M-Bus (wMBus) data from two types of water meters:
• Kamstrup Multical 21
• Kamstrup FlowIQ 2200
Using:
• ESP32
• CC1101 868 MHz radio module
• ESPHome
• Wmbusmeter add-on
You will find two complete YAML configurations included at the end of this guide.
Hardware Required
• ESP32 Dev Board
• CC1101 868 MHz RF module
• Jumper wires
• USB cable for programming
• Home Assistant
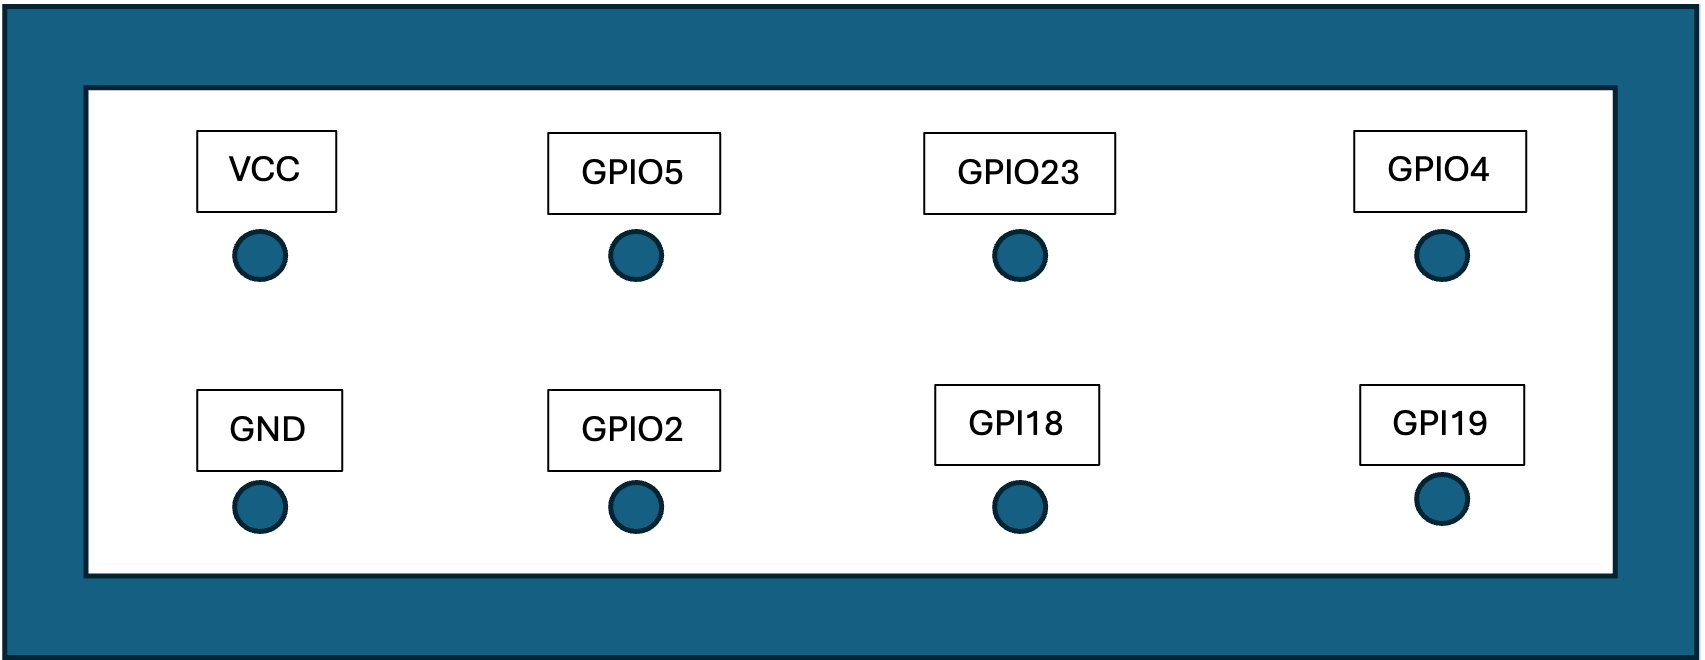
Wiring Diagram (ESP32 → CC1101)
Connect the CC1101 to the ESP32 as follows:
CC1101 Pin → ESP32 Pin
• VCC → 3.3V
• GND → GND
• MISO → GPIO19
• MOSI → GPIO23
• SCK → GPIO18
• CS → GPIO5
• GDO0 → GPIO4
• GDO2 → GPIO2
Install Required Home Assistant Add-ons
Install from Add-on Store and HACS (Home Assistant Community Store):
1. Wmbusmeter – decodes Wireless M-Bus telegrams
3. ESPHome – for firmware building and flashing (tested with 2025.0.0 to 2025.10)
Make sure these are running after installation.
Extracting the AES Key (KEM Key)
To decode encrypted telegrams, you need the AES key from your water supplier. Ask their customer service.
1. Open Wmbusmeters
2. Go to the “KEM Processing” tab and upload your kem file.
3. Extract the meter details (meter ID + key)
This key along with the meter ID will be used inside the YAML file. Meter ID is the same as the meter number printed on the meter.
Preparing the ESP32 Using ESPHome
1. Open ESPHome in Home Assistant
2. Click “New Device” → Continue
3. Select “ESPHome Web” to flash via browser
4. Connect your ESP32
5. Flash minimal base image
6. Adopt the device into Home Assistant
Once adopted, open the device YAML for editing.
Flashing the Final YAML
1. Use the YAML configuration from this guide or go to my other site pinout.se and copy it.
2. Paste it into the ESPHome YAML editor
3. Adjust Wi-Fi, meter ID, keys, and names
4. Click INSTALL → “Plug into this computer”
5. Flash via ESPHome Web
Your water meter should now appear in Home Assistant automatically. Open the ESPHome integration under settings/integrations and check if the meter sends values as intended.
Unfortunately this script is problematic with the latest version of ESP home builder. 2025.0.0 to 2025.10.0 is confirmed working.
Big thanks to all of you developers, SzczepanLeon and many more for providing this solution.
Multical 21 ESPHome YAML
esphome:
name: water
friendly_name: watermeter
name_add_mac_suffix: false
esp32:
board: esp32dev
framework:
type: arduino
logger:
level: DEBUG
api:
ota:
platform: esphome
wifi:
ssid: !secret wifi_ssid
password: !secret wifi_password
time:
– platform: sntp
id: sntp_time
timezone: Europe/Stockholm
servers:
– pool.ntp.org
– time.google.com
external_components:
– source:
type: git
url: https://github.com/SzczepanLeon/esphome-components
ref: c6430dd9d4da8c93ec3b400741d092a91bf26f8f
components: [ wmbus ]
refresh: 0s
wmbus:
mosi_pin: GPIO23
miso_pin: GPIO19
clk_pin: GPIO18
cs_pin: GPIO5
gdo0_pin: GPIO4
gdo2_pin: GPIO2
all_drivers: false
log_all: true
sensor:
– platform: wmbus
meter_id: 0x……… #Your meter id
type: multical21
key: “xxxxxxxxxxxxxxxxxxxxxxx” #Key from kem file
sensors:
– name: “RSSi”
field: “rssi”
state_class: “measurement”
accuracy_decimals: 0
unit_of_measurement: “dBm”
– name: “total water”
field: “total”
state_class: “total”
accuracy_decimals: 3
unit_of_measurement: “m³”
– name: “tapwater target”
field: “target”
state_class: “total”
accuracy_decimals: 3
unit_of_measurement: “m³”
– name: “tapwater temperature”
field: “flow_temperature”
state_class: “measurement”
accuracy_decimals: 0
unit_of_measurement: “°C”
– name: “tapwater external temperature”
field: “external_temperature”
state_class: “measurement”
accuracy_decimals: 0
unit_of_measurement: “°C”
text_sensor:
– platform: wmbus
meter_id: 0x………. #Your meter id
type: multical21
key: “xxxxxxxxxxxxxxxxxxxxxxx” #Key from kem file
sensors:
– name: “Watermeter Status”
field: “status”
– name: “Watermeter Dry Time”
field: “time_dry”
– name: “Watermeter Reverse Time”
field: “time_reversed”
– name: “Watermeter Leak Time”
field: “time_leaking”
– name: “Watermeter Burst Time”
field: “time_bursting”
FlowIQ 2200 ESPHome YAML
“`yaml
esphome:
name: flowiq2200
friendly_name: watermeter
name_add_mac_suffix: false
esp32:
board: esp32dev
framework:
type: arduino
logger:
level: DEBUG
api:
ota:
platform: esphome
wifi:
ssid: !secret wifi_ssid
password: !secret wifi_password
time:
– platform: sntp
id: sntp_time
external_components:
– source:
type: git
url: https://github.com/SzczepanLeon/esphome-components
ref: c6430dd9d4da8c93ec3b400741d092a91bf26f8f
components: [ wmbus ]
refresh: 0s
wmbus:
mosi_pin: GPIO23
miso_pin: GPIO19
clk_pin: GPIO18
cs_pin: GPIO5
gdo0_pin: GPIO4
gdo2_pin: GPIO2
led_pin: GPIO0
led_blink_time: “1s”
all_drivers: False
log_all: False
sensor:
– platform: wmbus
meter_id: 0xxxxxxxxx
type: flowiq2200
key: “xxxxxxxxxxxxxxxxx”
sensors:
– name: “RSSi”
field: “rssi”
state_class: “total”
accuracy_decimals: 0
unit_of_measurement: “dBm”
– name: “Total Water”
field: “total”
state_class: “total_increasing”
accuracy_decimals: 3
unit_of_measurement: “m³”
– name: “Watermeter Max Flow”
field: “max_flow”
state_class: “measurement”
unit_of_measurement: “m³/h”
accuracy_decimals: 3
– name: “Watermeter Flow”
field: “flow”
state_class: “measurement”
unit_of_measurement: “m³/h”
accuracy_decimals: 3
– name: “Tapwater Target”
field: “target”
state_class: “total”
accuracy_decimals: 3
unit_of_measurement: “m³”
– name: “Tapwater Temperature”
field: “min_flow_temperature”
state_class: “measurement”
accuracy_decimals: 0
unit_of_measurement: “°C”
– name: “Tapwater External Temperature”
field: “min_external_temperature”
state_class: “measurement”
accuracy_decimals: 0
unit_of_measurement: “°C”
text_sensor:
– platform: wmbus
meter_id: 0xxxxxxxxxx
type: flowiq2200
key: “xxxxxxxxxxxxxxxxxx”
sensors:
– name: “Watermeter Status”
field: “status”
“`
Recent Comments